Posts

Soap Project Phase 1 and 2: Bucks and Molds

Image
 Shaking the dust off this blog to post about my latest little pet project, Melt and Pour soap making. There's no rhyme or reason why I got into it. Candles are on the radar too but this first.  I decided to make my own silicone molds for my project as well as making my own tube molds out of PLA. My 3D printer is chugging away again!  Phase 1: Designing the Bucks Used 3D Builder to make the bases and then used some files from Thingiverse and a few that I made on TinkerCAD. I came up with several Demon Slayer related designs.  I first designed what I call my Wisteria Soaps. These were based off images of actual kamon (family crests). I kept them small so these could be my "sampler" soaps.  Then came the "kanji" soaps based on Demon Slayer. I have a few versions of finishes for these including embossed, indented and hollowed.  Then fox masks I retraced the lines as svg and used TinkerCad to make "cookie cutters" to cut indents into a fox shape.  Then the...

3D Printer to Die-Cutter Progress

Image
 There have been some hiccups in this process unfortunately. I still think this is a doable thing but for me, I have given up and purchased a Cricut machine to do what I wanted to do. It is still worth talking about where things were going so well and not so well.  It's got a Knife! So I purchased a generic knife holder with blades that fit elegantly into the blade holder I 3D-printed. I used small rubber bands to hold the holder together. I got my cutting mat and a piece of paper and started running some tests. And...it did work in SOME directions, but often the blade would get caught in certain areas on the flat bed. So I continually tried to mess with the bed level manually. No matter what I did, there were just some areas on the bed that would catch the knife.  The thing is, I had noticed in my 3D printing stencils as well that the corners just wouldn't get level. Thus I am struggling to remove stencils from acrylic glass.  So the big lesson I learned here is tha...

Acrylic Glass Art with 3D printing Series: Ruka and Kyojuro Painted Scene

Image
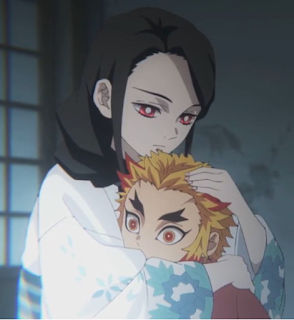
This was the project that really spear-headed the whole craze. I wanted to wait until I got good...but I didn't. I just went for it. And we'll see how it goes.  What I Used Materials: Acrylic Multi-Surface Paints, Stencil 4.8" x 7" Glass, Chrome Spray Paint. Vinyl sticker on back for protection(?) Method: Masking with lineart Color Method: Cel painting Colored Reference. Image Prep The image was originally from this  Stencil  which looks like it's based off a frame in the manga. That's why there's lots of little scratch lines and fiddly details. I opted to take out the flowers on the sleeve, thicken the lines in Kyojuro's eyes, and open up the space in Kyojuro's hair tips since I will color them later. Another thing I was trying to decide is if I would print the scene as a stencil or inverse stencil.  Stencil Version The pros of the Stencil are that the line art will be flat black paint (except Kyojuro's pupils which I will first paint white). ...

Acrylic Glass Art with 3D printing Series: Making a 3D Print Stencil

Image
In this method, the goal is to print the stencil directly on your glass piece. You may wonder, "Why print on the glass and not on the print bed?" So the stencil needs to be really flat on the surface to make clean lines. If it lifts anywhere, you lose definition. Well...it works well on paper. Anywhere the stencil "lifts" it's fuzzy. However on a piece of glass...the fuzzy parts don't look as stylish.  Hmmm...globby Kyojuro.  This is why we're printing directly on the piece of glass. The adhesion to the glass keeps it flat so we can paint or use etching cream or use an engraving tool I guess. You could invert the stencil too and make the inverse stencil the lineart of your piece.  Materials For this project you will need:  Isopropyl Alcohol  Filament  Optional Materials: .2 Extruder Nozzle Slicer program Pre-Requisites Check height of your glass directly with your machine. You want to make sure you got the correct height for your material. If you find th...

Acrylic Glass Art with 3D printing Series: Image Preparation

Image
 The big challenge for me has been making sure my images are prepared correctly to get the best results for my chosen project. I will go over how I evaluate how to use the image, how to convert an images into an STL stencil and some tips for editing images to make them more suitable to the task.  You can find images on 3D printing repositories meant for laser cutting or plain old stencils. Most of my examples I downloaded from the user Longquang on Thingiverse .  But you can make your own using your favorite image making program. Ideally, an SVG (Scalable Vector Graphic) will be the final result. However, I will show you the way to convert PNG to SVG so you can make your STL stencils! Yay.  Find/Making Best Images Depending on if you are cutting or stenciling, you will want to use images with some heft. Made from big, beefy, beautiful shapes.  Ideal image to cut or Stencil But most art (mine included) use thin, fiddly lines to make characters. But you can't make...