Posts

Showing posts from July, 2019

Prince Lotor Props - Day 0 - 1

Image
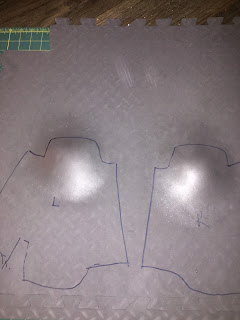
So this is apart from the costume for now because it's getting intense in the planning dept. wot. I have pretty much everything I need to make the cat puppet except for led lights and cabochons for the eyes. So I can't work on the face yet but here's the supply list for Kova the cat puppet. Black and Grey Minky (got) 18 gauge jewelry wire (got) Smaller jewelry wire (not sure of gauge) (got) Super Sculpy Clay (got) Cabochons (got) LED kit (ordered) Bicycle brake cable (got) Styrofoam ball (got) Tin foil (got) drinking straws (got) Wooden beads (got) Yarn - Black and Orange (got) Paint - blue, black, white, yellow (got) Glue (got) Wire cutters (got) Needle Nose pliers (got) Sculpting tools (got)  Paint brushes (got) I've created the armature and paws. 

Prince Lotor - Day 3 "The Gauntlet"

Image
Again, we keep up with the trend that I make everything for this costume twice. XD My method for making the gauntlets was sound. I thought that adding worbla would help...but it didn't. :( So many hours wasted. So I recut the pattern, heat treated and pressed it over the buck until I got that hump. The first go around, I made the left gauntlet too small. Second go around, both are slightly too big which is what I want. We'll fit things later. I also cut the first part of the chest piece out. So far nothing to worry about. So far... Meanwhile, I should be getting my order of more foam, LED lights, el wire and contact cement today. :) I should be able to pick up my fabric from the leasing office today too so no excuses for holding off...except the one excuse that I'm cramping like a mo-fo today and will be red-tenting it. Still. Things are looking better the second go around. Just a hard...expensive lesson to learn. Oh and I sent my application to join the Austin Cospla

Prince Lotor - Day 2.5

After looking at my photos and then at my fabric and then at my references, I came to the conclusion that the fabric color choice was very, very wrong. It was far too dark. So I did a quick search online for "denim" colored spandex. As luck would have it, someone did have a spandex in that dull blue-grey...or at least closer than navy blue. So I ordered it. Then I re-cut my pattern because I have new plans for how to do the paneling. So I cut one panel from my leftover black spandex. I'll cut my grey from the old suit. Now that I have clear thread, I feel better about the applique process. I also got some "non-skid" fabric for my shoes that I'm sewing and plenty of thread. For today, I think I'll serge the skirt together. :) And hopefully my shipment with clay and plastic pellets came today. Then I can work on art doll stuff too. :) UPDATE: Good news, my shipment of plastic pellets and clay came today! Mediocre news, I was able to get the tai

Prince Lotor - Day 2

Image
So, I finally decided on a couple of props to go with this costume: the sword and the cat.  I intend to make both. I'll probably work on the cat first because 1) I am confident in my plushing ability more than my foam carving. 2) It'll be a better prop for the halloween party than a convention. That way if the sword goes south, I have a backup prop. I purchased a pattern for the sword. I will be getting EL wire to light it up and probably more foam for the blade and hilt and some transparent thermal plastic for the glow bits. :P It will be interesting. As for actual costume progress, I've patterned out all my armor pieces. I also figured out how I'm going to get the "bump" shape on the gauntlet. I made a plaster mould that I'll press my heated foam against. :D (Thanks tutorial books!) And this past weekend I cut out all my fabric pieces and started construction. So I've got the jumpsuit, shoes, and tailcoat ready to go. The front of

Prince Lotor - Day 1

Image
Construction has officially begun! After a long time of collecting materials I finally got the motivation to work on a bit of it. Over the 4th of July weekend, I created the shoulder pads and the stencils for the design on the front. Also purchased the spandex and the costume pattern for the tailcoat. Here's the progress for the shoulders. Using my test craft foam pattern, I made a paper one. I played with the angles and sizes and cut them down to what I needed.  Then I cut pieces out of craft foam for the left and right shoulders. I used the Jacket sized shoulder pads to prop them up to the height I need.    Hot glued the pieces together and trimmed the blue part until I had the angle of attack.  I did a brief test with the shirt and found that just craftfoam would be too insecure and not stiff enough to hold the shape. So I added black worbla. (Regular would work find, but all I had was leftover black worbla.) I only added worbla to the top and left the si