Posts

Showing posts with the label Cosplay

Visual Novel Production! Costume Stuff! Future plans!

Image
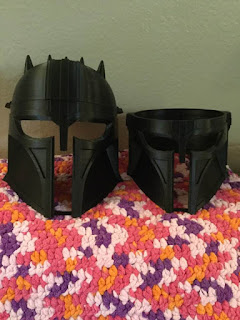
 I am chipping away at my visual novel, Trouble Brewing. That's been my main focus the past couple months.  Oh and mermaiding.  I'm couch surfing...lol. Not really. I've used the tail at the pool.  I have finished 3D printing and gluing together the chest piece for the Armorer:  And finished the backpacks for my nephews:  But like I said, most of my time is on the visual novel. I've been making new sprites and coding/scripting the darn thing. Finally got through chapter 2 and now it's chapter 3.  Still doing research on Rescue. I don't think I'll make it for Halloween. I think I'll focus on the Armorer this year. Ahem...and my kitsune costume take 2. Making a cosplay of my own character!  I just need to make the tails, ears, belt boot covers, sleeveless jacket and bracers. Really...not a bfd. I have most of what I need for it. I'm also considering doing some costume concept tutorial series here focused on swim-friendly mermaid costumes and kitsune...
3D Printed Cosplays

Image
It's 2021 and this past year I've started getting the hang of 3D printing. It's fun. It has greatly expanded cosplay potential. So, right now I'm working on a few 3D-printed armors  Armorer The first project I started in November while visiting my parents for Thanksgiving. I got caught up with the Mandalorian and just felt a desire to at least print the Armorer's Helmet.  Well...I did just that! With the helmet printed and painted. I opted to go for the whole costume. I have patterns for some of the leather parts, a shag fleece fabric for the mantle, and patterns for the chest armor. I have yet to print the chest armor, but I expect to do so soon. The hammer prop and the belt do-dads are already printed but not assembled.  Rescue: MCU So the other bit of armor I'm planning to do is Rescue (Iron Woman...in a sense) from Marvel Cinematic Universe. This one is in heavy planning stages. I purchase some 3D files for the armor pieces and resized them to fit my body me...

Zelda Day 2-3

Image
 There's not much time between now and Halloween but progress is finally being made with Princess Zelda.  Day 2 - Apron First day, I prepped my white cotton, used my template and cut out 4 copies of the apron. Took those pieces and used Color Max Spray paint to make the blue and purple gradient.  Cut the template a bit and taped it down to the cotton to spray paint the green edge. I printed out a second copy of the template for the gold and purple paint which I will do by hand with the template as guidance.  I have four copies of the apron just in case. Once I have the gold parts painted, I'm going to use some bond and fuse to put two of the apron pieces together, with a bit of interfacing or foam pieces along the top to connect to the belt.  Day 3 - Pattern cutting Last weekend I got my flu shot so I wasn't feeling so great over the weekend. Plus I got sidetracked with some crochet projects. I just get in these crafty moods sometimes. Anyway, I did cut out the ...

Costume Progress: Zelda and Linkle

 With no events to really set a hard deadline on costume projects, things continue to progress at a leisurely pace. But they are progressing.  Princess Zelda So I have all the armor parts 3D printed. Did a few layers of finishing on them but there's still plenty of work to do for those I've been coating it with clear polyurethane Things are starting to feel smooth to the touch. I also 3d printed a Heart container for fun. I'm out of the gold filament so trying be careful with my armor pieces.  A couple days ago I purchased the fabric to make the dress with and received the package of wigs!  Linkle For this I recently got the wig and wefts. I have 3D printed all the metal parts of the cross-bows. I got the nozzle and wood filament for the rest of the crossbow parts. Lotara Remade my prototype for the leather armor. I looked at the fabric I got but haven't touched it since the 3D printer is taking up my sewing table at the moment. 

Project Slow Down

It's always a bummer hitting a snag in a plan. However, Summer is always a mixed bag when it comes to projects. Obviously this summer has been full of snags around budget and mental health. And I feel like every few years I tend to shift gears from one creative pursuit to another. I'm wrapping up the writing for my visual novel which means I need to start cranking out some art. Due to aforementioned budget concerns, I don't think I'll be able to afford hiring out for many artists. Still want someone else to handle backgrounds but we'll see what I can do in the mean time.  This past weekend I finally cleaned my crafting space since it's been full of delivery boxes for weeks. I still need another shelf or container unit to hold supplies neatly but I'll feel better once I get that done.  I did get my fabric for Lotara. Waiting on the wigs for Linkle and Zelda. Finished printing the armor for Zelda. Got the parts I need to print out Linkle's crossbows. Re-di...

Triforce of Costumes - Day 0

Currently working on 3 costumes at once. Which may be a bit overzealous but it is also practice for eventually making costumes for others. On my plate is: Lotara the Drow Elf, Princess Zelda and Linkle.  Here's where things are at so far.  Lotara Materials Gathered:  Wig Fabric for undergarments and under-coat EVA for armor prototyping Latex Elf Ears Face Paint Stockings for "leg skin" High knee socks Ear Cuffs Makeup Dagger Prop Materials Needed: Leather  Leather Paint Long gloves (or fabric for them) Boots Finger Armor (maybe) Princess Zelda Material Gathered:  Latex Elf Ears Wig 3D printed Jewelry Pattern for Apron Pattern for Dress Vector Sample for Embroidery EVA for Hair ornament (might use leather instead) Materials Needed: Boots (probably will use the same boots for all 3 characters if possible) Ribbon for Hair Finish printing shoulder armor Fabric for dress, apron and overcoat Fabric paint for Apron Opera Gloves Fabric Paint for gloves  Create Embr...

3D Prop-agation

I'm getting better at 3D printing props. Who knew there's a learning curve to everything? So a few things I've learned so far from mistakes I've made. What I've successfully made. And what I'll be reprinting. First successes: 12-Hole Ocarina of Time 6 - hole Ocarina of Time Dagger of Venom Rupees Corona Mask of Darth Vader's mouth Prince Lotor's Sword Princess Zelda Shoulder Armor (half done) Zelda Crown Zelda Belt Mild Successes (They came out okay but due to my own error they didn't construct correctly): BOTW Master sword Shekiah Slate Dienonychus Skull Glass Dagger Zelda's Sword Linkle's compass My Common Mistakes Messing with the machine while it's printing.  Not properly leveling the bed Increasing wall count which makes pieces no longer fit together.  Travel speeds and print order knocks over tall pieces Poor object orientation Sacrificing quality and strength for speed Not thinking through lighting...

A Zelda Cosplay - Debating which version to do

Image
So a cosplay that I've wanted to do for awhile is Princess Zelda...or someone from the series. And eventually I may do them all but for now here are the ones I've thought about. Princess Zelda from Breath of the Wild As of the writing of this blog, this is the most recent iteration of Princess Zelda. She has multiple outfits to cosplay from. A priestess dress, exploring outfit, princess dress and winter wear. Obviously, I'm not up for winter wear. I am also not confident about pulling off a Greek dress with no determinable way to keep it up over my bosom. (I don't like strapless dresses.) So, the princess dress and explorer outfits would be my options of interest.  Pros: The explorer outfit is comfortable looking, convention friendly in that I can use my shekiah slate phone case and it has a pouch, there are plenty of patterns available and examples. The dress also looks comfortable and flattering and I don't have to worry about making shoes. The wig sty...

Lotara Planning - Drow Cosplay

Image
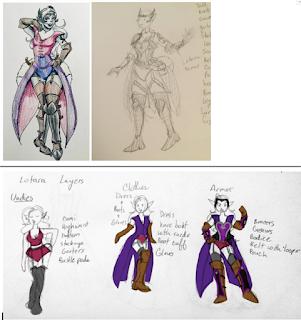
So I've started purchasing materials, so I can say I've officially started work on this project. So this character design started as a derivative of the Lotor bodysuit. But as I've been working through the leather work course and learning about armor design, I started focusing more on themes, shapes and armor pieces. The bottom row is the current plan without much of the details.  I've illustrated the costume breakdown here. Layer 0 - Body Mods Body paint ✔ charcoal tights and arm warmers ✔ latex elf ears ✔ white wig (reusing my Lotor wig) ✔ Other makeup ✔ Layer 1 - Underwear-ish Camisole/Sports Bra (any color) ✔ Magenta high waist bikini cut bottoms $ (fabric bought) Garter belt ✔ (using scrap fabric) Thigh high stockings - black ✔ Bustle ✔ (using scrap fabric) Layer 2 - Clothes Knee high boots with front cuff (plan on using stretch suede and boot covers) Opera length gloves (I plan on using stretch suede) Sleeveless long tail coat $ (f...

Prince Lotor Props Take 2

Image
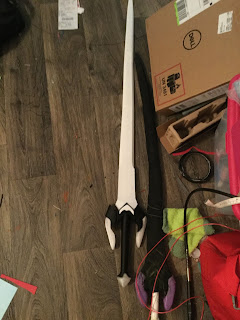
So like I said last time I got this sweet stl file off Etsy and have begun printing out the sword. I have printed out all parts. The past couple days I've been gluing parts together. Dyed the clear guards and pommel. Filled some of the gaps with wood fill. And used pink fairy lights for a lighting effect. Here's the hande. The blade was trickier to keep together. Some pieces I had to re-glue several times before it finally cured and stuck together. Reinforced with wood fill.  Things I still need to do. Paint and glue the decals. Reinforce and smooth down with clear epoxy resin. Then I'll paint the blade.  I'll resurrect this costume at some point for a photo shoot.  I'm making a bunch of other video game swords too. I'll post about those later. For now Peace! 

3D Prop Addiction

Image
I have a 3D printer now and I've become addicted to it. I purchased an STL file for Lotor's sword  and have been printing parts of it for the past couple days. To the right is my EVA foam sword. It's gotten warped. I mean...shape-wise, with a bit more TLC, the foam sword looks really good. However, I like that the machine does things for me too. (Now with all the parts printed.) With all the parts now printed, I need to sand a few parts, dye the clear stuff to purple, assemble and sealing gaps, then priming and printing. I'm waiting on some LED fairy lights for the cross guard. I've downloaded and purchased a bunch of swords and daggers. I'm just going to have an arsenal of fake weapons. :B Currently plan on making the following Swords: Master sword (with glows) I mean...everyone does this right? Zelda's sword from Twilight Princess (also got her shoulder armor and jewelry from that so, she'll definitely be a cosplay) Sword of Faith fro...

Lotor Supply Cost (Scratch vs My Actual)

Scratch: If I did not already have any supplies on hand. (Also excluding tools such as a dremel, drill, paint brushes, scissors, sewing machine, Hot glue gun, heat gun, respirator and such.) Actual: With the things I had to repurchase due to fuck ups and excluding supplies I had on hand from previous cosplay. Scratch list Skintone, Ears, Hair Mehron Paradise Purple/TAG Lilac Primer Setting Powder Barrier Spray Eye Shadow (dark purple, white, lilac, pink) Wedge Sponges Blender sponge White eyeliner Black eye liner.  Clear gluestick  Latex Elf Ears Spirit gum Liquid Latex Lace front wig Long weft Fabric glue Spiking gel Hair spray Silicon Lubricant spray Barber Scissors Felt Armature wire Flat Elastic (white) (~$245) Clothing Portion Denim colored spandex 2 yd Black spandex 3 yd Burnt Orange spandex 1.5 yd Orange spandex .5 yd  Grey charcoal leggings x2 Interfacing .5 yard Clear elastic Snaps Thread Leotard Pattern Shoe Patter...

Lotor Lessons - What I'd do differently

If I knew then what I know now, here's how I'd do this project differently. 1) 4 mm and 10 mm EVA foam for all armor pieces. I don't have an electric sander or the elbow grease to remove the patterning from floormats. 2) Don't use Worbla on full cylinders. If you want a slide-on piece, eva foam is the way to go. 3) Use sandpaper, not the dremel first. 4) Find the right bit on the dremel to drill holes. There is one. The Drill was too much. 5) Make the buck out of polymer clay. Also the thinner EVA is easier to heat treat. 6) Don't serge on one of the most expensive parts of the costume. At least Baste first. 7) Paneling is really the best way to handle the whole top leotard. Black from neck to leg line. Grey from neck to crotch. You could wrap craft foam in the same color spandex and glue them to the chest armor for ears. Alternatively Use small triangles with heat and bond. Orange spandex for the sleeve isn't a bad idea either. It just needs caref...

Prince Lotor - Pre Convention Tweaks

Image
Mood: JUDGING YOU WITH GREAT PREJUDICE! A couple things learned from wearing the costume for a longer period of time and moving around in it: 1) The soft shoes that I severely injured myself making didn't work. The shoe armor was too thick and they were nearly impossible to walk in. 2) The front belt buckle needed a bit of support to lie flat against the seam of the leggings. 3) I need to reinforce the wig style with some thread or something. It's too thick for only glue to work. 4) The straps needed some tape to reinforce the glue. So here's what I did to address these issues. 1) I redid the shoes. I had sewn some "stirrups" for the leggings but it turns out the leggings were long enough to partially cover my feet already. I was able to pull these stirrups over some old shoes that were falling apart. They became handy boot covers! From there I took black craft foam and measured around the shoe to make the pointed toe armor and trim. I painted it ...

Prince Lotor - Halloween build

Image
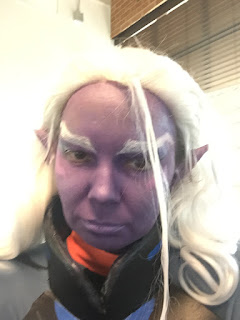
Today I got to wear the Prince Lotor costume at work for Halloween. Learned a few things about wearing it in the process. This will let me make a couple of tweaks before the convention. So a couple straps need securing. (One I knew was loose and didn't fix. One broke off this morning.) The shoes really aren't working that great, I have a pair of loafers I might make a boot cover for out of spandex. Because I have SO MUCH LEFTOVER BLACK SPANDEX!!! Just need to practice posing a bit. These are pretty good. The LEDs on the gauntlets don't show up well here. Wig is on point, but I need to remember to flip my hair behind my ears and shoulders for best effect. Also need some belt taming.  All in all...BIG SUCCESS. I'll be ready for the con in a couple weeks. It takes 2 hours to put on the costume with 1.5 hours to put on makeup. Not too shabby.  Con plans: Go in the morning wearing Lotor hoodie, check in, sign-up for the contest, (if weapon done get weapon c...

Prince Lotor - Day 20 + 21 + 22

Image
This has mostly been about little tweaks here and there on the costume. Fixing loose straps and such. Most of this past weekend was prop work. The cat Kova is finished: Doesn't look quite like how I imagined, but he is recognizable. :) He's serving as a decoration on my spooky desk. The sword is coming along nicely for a first time prop. I used some thermal plastics to make the pommel and the hand guards.     The EL wire is in. (I forgot to get batteries yesterday. FUK!) But the plastic is on the sword. I need to make some adjustments around the battery pack, cover the grip and attach the pommel. I need to make some stuff out of craft foam then I can seal and paint. I hope to get it done in time for the convention but I'm not holding my breath. The logistics of bringing a weapon is a bit beyond what I can handle right now, so I'll use it for the photoshoot I'm planning. Or the next con I decide to go to. :)  On Sunday I did a makeup, wig and costum...

Prince Lotor - Day 18 + 19

Image
It's getting close. I can feel it. After several roadblocks this week, the costume is finally in a wearable state. So I'll be doing a test this weekend for any last minute stuff. Now here's what I worked on last time: Belt:  I redid the belt. After seeing how uncomfortably it sat on the dress form and what I needed it to do, I opted to change it. So I took it apart and used the pieces to trace out the buckles in craft foam and the sides in black spandex. The nice thing about this is that using spandex meant I had now TWO side-saddle bags basically making them ultimate pockets/fanny packs. Amazing. I wrapped the buckles in black worbla and smothered the front buckle in velcro. Sword: So I also started the base work for the sword. I had most of the pieces already cut out.  First I shortened my PVC pipe with a hack saw. I dremeled a groove in one of the blades and put in two plastic straws before contact cementing the two sides together.  I also cut on...

Prince Lotor - Day 17 Wigging Out

Image
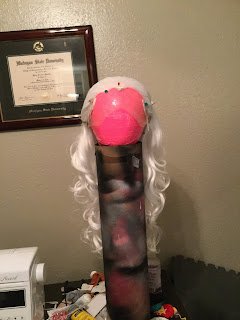
This weekend was hair and makeup. Although, I didn't go to the Salon. I wish I did. I could use a facial. UGH. Anyway, I finally took the wig out and admired it's splendor. At this point I just slicked back some of the hair and put in some craft foam markers for the widows peak and sideburns. I just love how nice the curls look. 😍 But it needs more widow's peak or some changes in the hairline. Which means I needed to ventilate. I don't have a ventilating hook but I learned how to do it with a normal sewing needle. It's probably a bit easier.  But before starting ANYTHING, I installed an elastic band so I wouldn't need to use a bunch of glue or tap to keep the wig on. A trick I learned from some videos. With the band in place it really uses friction to keep the forhead lace flat against your head. I still may need to use some tape for the sideburns though. I need to find my hem tap. :P Anyway, here's what the ventilating looked like after 4 hours o...