Posts

Warden Armor Mini-Update 3/25

Okay, quick update. I've gotten to the point where I have sealed and painted some armor pieces. The shoulder pieces are almost done. I just have one more section I have to figure out. But the pauldrons and spaulders are in a good place. The chest pieces is pretty much done. I still have to add the strapping and connections for the straps but I'm in no hurry. So my camera ate the pictues and video I took. :P I'll have post how the painting went.

Warden Armor Progress Report: 3/10/14

Image
I've been working on and off with armor pieces for the past few weeks. Mostly cutting out the foam pieces and making plans. Here's the progress of various pieces. Chest: (see video) Cut out of foam. Ready for sealing Helmet: Experimenting. As you can see I'm making it up as I go. But I think I'm getting closer. My Hair dryer does make a decent heat gun for thin foam...although...it's still hard to make it hold that shape. :P Collar: Needs to be cut Spaulders:  These just need sealing and paint before being put onto fabric. Shoulders: (pic) This is giving me the most trouble right now. Trying to form the correct shape out of foam is surpisingly difficult. Here are some of my failed experiments. Thicker Foam Frame: It didn't make the shape right. (pic) Cardboard frame: CLOSE but not quite. (pic) Thin foam guide shape: I'm getting somewhere! (pic) FINAL THOUGHTS. The big issue is Buckling. What I have to do is make trianglar cuts in...

Interesting (not distraction) research and progress

I've been conducting research on various ways to give foam a hardened finish. Originally, I was going to go with Styrospray, but it's $30 a pop and I'm thinking there's got to be an easier/cheaper way. Here's some things I found as suggestions. Bedliner - for trucks. Durhams Water Putty* Wood glue Foam Coating I managed to find the water putty at Home Depot today for like $2. Compared to the 30 dollar option it seems awesome. But this is also based on my "needs" for the costume. It doesn't need to be "battle ready" and I don't intend to play act in it. Just pose. ;) Also, I've never used the stuff before so it's a cheaper experiment really. I've also sort of started experimenting of the chest piece for Alistair. ...It is trickier than I first anticipated. Also you'd think using a box cutter to cut boxes would be...I don't know...less of a hassle? Ah wells. I still intend to cut the heck out of the boxes that ...

Interesting (distraction) research

I don't know why I cosplay series many years after they have their hay-day but that just so happens to be WHEN my interest in a series really gets sparked. Soooo...one of the projects I've put on my radar (as it is so far back on the back burner I need radar to find it) is a Turian from Mass Effect...probably female. I've been having fun looking at Mask options. Here's what I've found so far if you are curious. Red Nebula Studios ) - Resin Mask @$250 Foam Mask Paper Mask Foam is most likely going to be MY option and depending on how well the Styrospray works on my armor.

Alistair Armor: Day 1

Image
Progress report. I've finished the paper patterns for the armor pieces of Alistair's armor. Arm Bracer Elbow Piece Chest and back (may need some altering. Should be wider at top.) Everything else: Boot, knee, thigh, shoulder For this pattern it's important to measure out the "strips" that make up the armor pieces as well as the shape. For this style of armor both elements are important. All pieces will have a "base" which takes the shape of the piece. All pieces will also have what look like strips. There are a few ways I could approach this. The method I decided on was to make a thin base in the shape of the armor piece and then cut the strips and lay them over the base. Each strip will be covered in vinyl pleather.

Plan Update: Alistair Armor

Alistair's Armor This is my current shopping list for Alistair's armor. It's subject to change and I will update it as needed. UnderArmor yoga pants - owned Boots - owned Black/brown longsleeved shirt - owned? Coat Wefts of Yak hair / mohair undyed Brown microsuede / flannel 2 yards Armor pieces Cardboard - owned Foamies - owned EVA foam - owned flannel fabric / cotton - 1.5 yards? (owned?) brown Pleather - 2 yards brass studs Cording Suede (boot covers, mantle) - 1 yard Accessories Belt - owned? Leather Pouch - buy at ren faire knife - owned sword - owned Gold cord - buy Gold domed buttons?/Resin/gold - buy/make

DA2 Warden Day 1: Patterns

Image
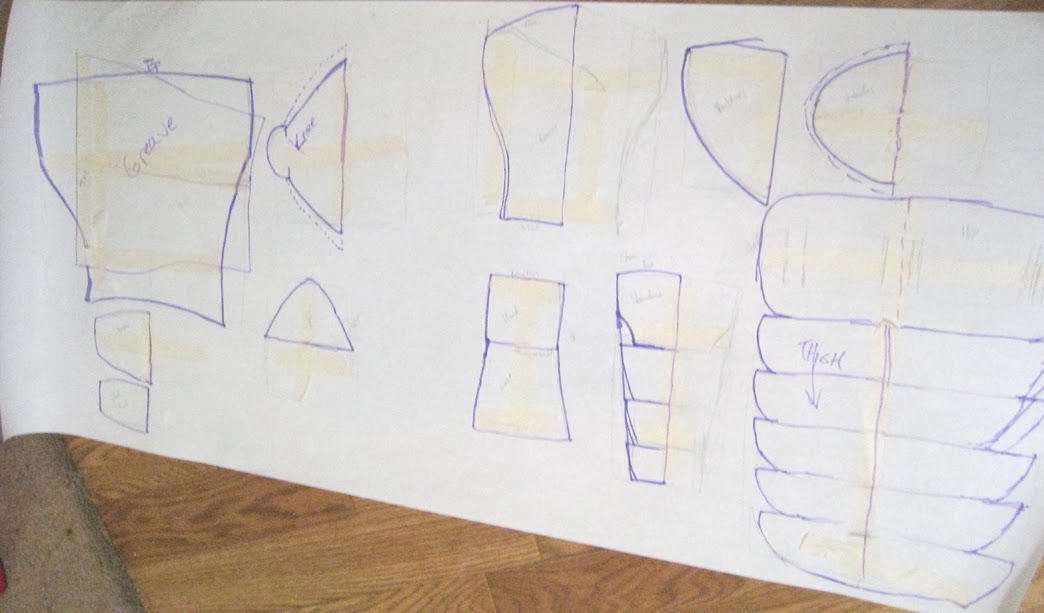
So it begins. I have finally gathered enough supplies to get things started. I will post a vlog about things once I get my camera (which should be any day now). But the armor piece patterns have (mostly) been made. The helmet is giving me some difficulty. Here is an image of most of my pattern pieces. (I forgot the collar and breast plate. But I shall post them soon! Here's how I went about making the patterns. 1. Measurements. For me I used a rather estimated method of measuring for the various pieces. First, I opened up my reference images and found the piece I wanted to measure, for example the breastplate. Using masking tape, I taped over my clothes the width and height of the armor piece based on the image and relative to my body. Alternatively, I could have used measuring tape and wrote these things down, but there's a reason I wanted to try the tape. 2. I peel off the tape in one piece and lay it down on my pattern paper. Alternatively I could have used ...