Voltron Paladin Pidge - Pre-Production
It's been far too long since I made progress on this particular costume. Re-reading the pattern for the shirt and pants got me into planning mode. The planning was somewhat interrupted dealing with an issue with ants in my apartment. >_> Apparently, my honey in the pantry called out its siren song to them. Luckily they've mostly been near the ceiling, but also unluckily it's hard to spray up there. Now, I have the heebie-jeebies all the time and I keep doing that paranoid check...Are there more!?
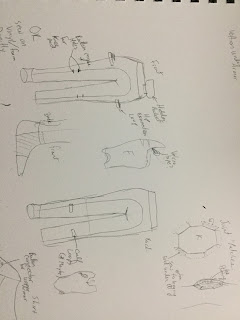
Like I said, super distracting. Anyway, so I'm going to share my thought processes and "think out loud" type moments. Starting with the pants.


Like I said, super distracting. Anyway, so I'm going to share my thought processes and "think out loud" type moments. Starting with the pants.

For the pants, I'm adding elements from other patterns like the "Yoga Stirrup" from Bernina and the hidden pocket from my Sloan pattern. So I started sketching out how those would work with the pattern I have since the waistband is constructed differently in my base pants pattern. During the re-read of the pattern, I discovered that the pants I want to make include a side pocket! I was like "neat! I could use that to help support the thigh armor. From my days with the Halo Spartan armor...I recall how tricky that part was to keep from slipping. But in the end, I decided that instead of pockets, loops would be better to secure those parts. I was thinking velcro tape
Now the knee joint I was planning on sewing it directly onto the pants. Thinking of how, I had a brief moment of madness thinking I could use a button on the kneepad and add button holes to the leggings. Then I was like...oh yeah, I was going to put these on the suite directly! I did a vague sketch of my plans for that. I'm going to use some kind of fabric covering for the foam armor. I'm debating whether or not I want to use vinyl stretch or simply performance wear spandex. Either way, it will need extra trim which I will fold under and sew the seam allowance directly to the knee of the leggings.

Next item is the shirt. The shirt pattern came with a sort of slouch turtle neck version and a hoodie version as well as the round collar. I tried to see if the pattern could be manipulated to create a mock turtleneck but in the end I decided to not burden myself by complicating the already complicated pattern. (Princess seams are pretty but no joke.) So instead I ended up buying one of these: https://www.pinterest.com/pin/537476536774327292/ and a pair of black costume gloves.
Now my big discovery as it were was the shoulder pads. I was mucking about with a spandex shirt I have for another costume that had a similar neckline to the one I'm making. I couldn't find the dress shoulder pads I usually test things with but I did find a pair of fluffy socks still in the package. I stuffed that under my shirt and over my shoulder with the heel of the sock toward my shoulder. I was floored...it was the EXACT shape I was looking for. It raised the shoulder line, pushed it out like proper sports padding would and made the shoulder do a slight mutton chop shape just like in the show! I just need to cover the shoulder of the shirt with my colored foam piece and let the under padding do its work! I tested it with other socks and it works. That's the shape and thickness. Just about an inch or so thickness and a boomerang shape. I'll probably sew them onto the dicky.

Along with the shirt I had to consider the arm bracers. Looking at other builds the hand plate is usually independent of the whole forearm piece. Which makes it a "natural" slide prevention.
Now keeping the upper arm bit from slipping was something I was trying to solve for. This is where my button and loop or buttonhole made more sense. I intend to make the bicep piece "seamless" so that I just slide it on. The wide collar on the shirt makes it easy to manipulate under the sleeve.
The forearm is currently planned to be seamless as well. It may also need a button hold somewhere but the glove piece may be enough.
My other issue is the wrist movement or limitations that the design poses. My doodle highlights my problem. Palm out and back will force the wrist bump to either bend and squish or potentially slide the whole piece up.
Lastly a part I haven't thought of really before...the shoes.

So I doodled based on what I see in official art. My two options are 1) Boot cover over flats. This would be the easiest option as there are plenty of tutorials. Alternatively, I could MAKE A SHOE!
I want the challenge. I've sewn baby boots and I have patterns for adult shoes. I have the perfect pattern for the shoe. (Actually I just went back to the site I got it from and found a better one.) Abella Women's Shoes from ithinksew.com. (Samantha like my notes are also good.) Then create the sole it needs to fit into. Could be fun. :)
This weekend I hope to start sew the pants and shirt.

Comments
Post a Comment