Posts

Showing posts with the label Props

3D Prop-agation

I'm getting better at 3D printing props. Who knew there's a learning curve to everything? So a few things I've learned so far from mistakes I've made. What I've successfully made. And what I'll be reprinting. First successes: 12-Hole Ocarina of Time 6 - hole Ocarina of Time Dagger of Venom Rupees Corona Mask of Darth Vader's mouth Prince Lotor's Sword Princess Zelda Shoulder Armor (half done) Zelda Crown Zelda Belt Mild Successes (They came out okay but due to my own error they didn't construct correctly): BOTW Master sword Shekiah Slate Dienonychus Skull Glass Dagger Zelda's Sword Linkle's compass My Common Mistakes Messing with the machine while it's printing.  Not properly leveling the bed Increasing wall count which makes pieces no longer fit together.  Travel speeds and print order knocks over tall pieces Poor object orientation Sacrificing quality and strength for speed Not thinking through lighting...
Prince Lotor Props Take 2

Image
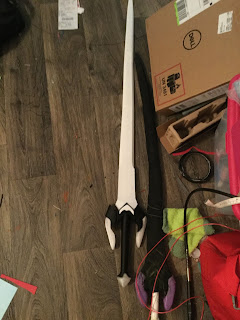
So like I said last time I got this sweet stl file off Etsy and have begun printing out the sword. I have printed out all parts. The past couple days I've been gluing parts together. Dyed the clear guards and pommel. Filled some of the gaps with wood fill. And used pink fairy lights for a lighting effect. Here's the hande. The blade was trickier to keep together. Some pieces I had to re-glue several times before it finally cured and stuck together. Reinforced with wood fill.  Things I still need to do. Paint and glue the decals. Reinforce and smooth down with clear epoxy resin. Then I'll paint the blade.  I'll resurrect this costume at some point for a photo shoot.  I'm making a bunch of other video game swords too. I'll post about those later. For now Peace! 

3D Prop Addiction

Image
I have a 3D printer now and I've become addicted to it. I purchased an STL file for Lotor's sword  and have been printing parts of it for the past couple days. To the right is my EVA foam sword. It's gotten warped. I mean...shape-wise, with a bit more TLC, the foam sword looks really good. However, I like that the machine does things for me too. (Now with all the parts printed.) With all the parts now printed, I need to sand a few parts, dye the clear stuff to purple, assemble and sealing gaps, then priming and printing. I'm waiting on some LED fairy lights for the cross guard. I've downloaded and purchased a bunch of swords and daggers. I'm just going to have an arsenal of fake weapons. :B Currently plan on making the following Swords: Master sword (with glows) I mean...everyone does this right? Zelda's sword from Twilight Princess (also got her shoulder armor and jewelry from that so, she'll definitely be a cosplay) Sword of Faith fro...

Moving into 3D!

Exciting day. I finally invested in a 3D printer! It took awhile to figure out which one to go with. I was enamored with the idea of a resin 3D printer. However, because I plan to use it for both cosplay AND DnD minis, the PLA printer is the better option. :3 So my plans for now are going to be to run some test prints. Print out one of my Hero Forge minis and 3D print Lotor's sword. The foam one is good but it has pushed me to the limit of my skill and I'm more interested in leather working right now. I'm half-way through my leather working course too! So yeah, that's about it. Happy Ash Wednesday!

Prince Lotor + Props - Day 4

Image
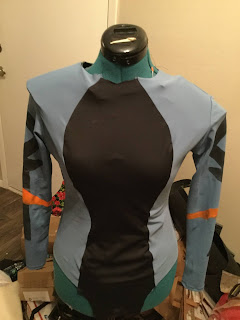
Another sewing weekend. Got half of the leotard finished. The paneling is much better on this one and we got the sleeves on! I did a test with the shoulder pads and they do fit fine after some major adjusting. I definitely need to sew the fabric pads down to the compression shirt I'm making. :) There's some tightness in the sleeves but that's more due to my chubby arms. (Working on it.) I still need to add the grey appliqué which I'll most likely use fabric glue and iron on bonding for. Tricky to do for stretch fabrics but  sewing it on was not the best option last time. Also need to finish the leg holes, add snaps and the collar. I started painting the orange line but that may take a few layers.  I'll make the gloves and shoes after this.  Also during the week I was able to finish the head for Kova. And I got his eyes to glow. After some initial testing, I've decided not to make him a puppet but just keep the light up eyes. Check 'em out! ...

Prince Lotor Props - Day 2

Image
So late last night, I started playing with clay. I didn't really think I'd actually try it but I got my cabochons and wanted see what I could do. An hour or two later I had this: I did some corrections after this picture was take so the eyes didn't look so uneven. But I baked it up last night and hey...I have a cat head! My debate right now is whether I should make the ears out of clay or from fabric. I feel comfortable with either option. I might start with clay and see how that goes. :) Then I'll paint. 

Prince Lotor Props - Day 0 - 1

Image
So this is apart from the costume for now because it's getting intense in the planning dept. wot. I have pretty much everything I need to make the cat puppet except for led lights and cabochons for the eyes. So I can't work on the face yet but here's the supply list for Kova the cat puppet. Black and Grey Minky (got) 18 gauge jewelry wire (got) Smaller jewelry wire (not sure of gauge) (got) Super Sculpy Clay (got) Cabochons (got) LED kit (ordered) Bicycle brake cable (got) Styrofoam ball (got) Tin foil (got) drinking straws (got) Wooden beads (got) Yarn - Black and Orange (got) Paint - blue, black, white, yellow (got) Glue (got) Wire cutters (got) Needle Nose pliers (got) Sculpting tools (got)  Paint brushes (got) I've created the armature and paws.