Posts

Showing posts from 2013

The Next Project: DA2 Warden Armor

Image
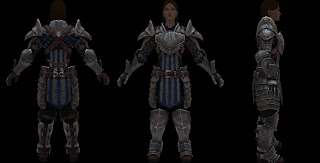
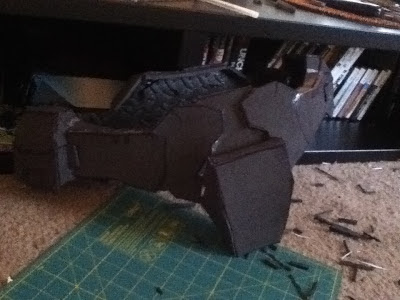
Been awhile since the last post, but since finishing the Halo Armor, I hit some rough patches of finances which hinders new projects. I've been trying to land a better job and haven't had much luck lately. I have long-term temp work which has been paying the bills, but only paying the bills. :P In good news my mother is helping me buy a new sewing machine. One that will be my very own. :) But for now at least I can go into the planning/collecting portion of the new costume project: Grey Warden Armor. Reference: Parts:  Tabard Blue Fabric: Cotton fabric or Fleece White/Silver fabric: Sheen fabric like satin or something with a sequin pattern. Other ideas: the silver part is actually scale mail I could imitate that pattern of scale mail or thin aluminum flashing. It all depends if I want to put the effort and money into making the tabard scale mail. UPDATE: Omg...This silver fabric for the win: Link  Shoulder Shrug: Blue - Blue Pillowed Fabric. There's a

Halo Armor Day 28 - Fin for now

Image
Wooooty wooo! The armor be as done as I think I can handle. It's all pink, glittered and unicorned. :) I even spray painted a nerf gun. :D  Because I live alone and was too excited to set my laptop right, I was not able to get a good full body. I will soon. For now some pictures. At AnimeFest in Dallas! Cosplay Fashion show!

Halo Armor Day 27

Image
A hotter pink for the armor. :D 2nd coat plus glitter. Couldn't get a good picture of it. Now I will paint the details with acrylic and a brush. I tried spraying a decal but it was too runny. :P Darn my impatience. Okay and then it sorta started to rain so I had to haul everything back in. We'll see if things need yet another coat or not.

Halo Day 26

Image
So I painted the first coat and I ran out of pink paint. I also did a dumb thing. I left my armor outside to dry...in Texas...in the summer...it's over 100 degrees. The hot glue started to melt so some pieces  Some things may need to be reglued. :P So I need to get another can of pink...and possibly more hot glue sticks. :P It's PANK! 1 Coat of paint. I've also fixed the foam parts that fell off or came apart.

Armor Day 23-25

Image
Many days pass and I've finished "detailing" as much as I think I can for this set of armor. I've also finished sealing the foam with PVC glue. I'll do a test paint on Monday to see if the pieces need more glue or not. *sigh* The helmet still looks uneven. Waiting for everything to dry.

Armor Day 21-22

Image
I have pictures on my camera that I'll post up here later. I haven't abandoned this project yet. Just having to deal with unemployment. :P In any case, I've been patching up and cleaning up my work on some pieces with foamies. Currently the chest piece and belt are "ready" for sealing and paint prep. So close! I'm not looking forward to the helmet or forearms. They currently look the worst and need the most work.

Halo Armor Day 20

No pics this time unfortunately but I've finally started the long grueling process of "correcting" my mistakes on armor pieces. I've started on the helmet which has been a process of un-gluing, re-gluing, adding thinner foam to places. It doesn't help that I've been very distracted by video games, but it will get done once I finish the game series. But the next 3 weekends I have weddings to go to. :P ARGH. In any case, I'll probably work on the belt, forearms and shin pieces details. Helmet and chest piece will be last. I want to seal and paint it SO BAD!

Looking Ahead: Future Costume Ideas

So I've caught the costuming bug this year. My mom and I just switched out sewing machines so I have a smaller more manageable sized sewing machine. (Still old but not as heavy to lug out.) I hope to get a new machine someday, but checking the prices I think that saving up for a couch is a better investment. However, foam armor is also pretty awesome stuff. I think I can finally venture out and really go forward with costumes I've really wanted to make. Some ideas I've had for cosplay costumes that I want to try:  - Mass Effect N7 Armor  - Dragon Age 2 Style Warden Armor   - Gender-bent Dragon Age Alistair Armor ( Probably the comic version )  - Lord of the Rings Eowyn Shieldmaiden  or Dernhelm   (Might be a bit too crazy because chainmail...yeah.)  - Lord of the Rings Lady Hobbit  Someday I also intend to make a new ren faire outfit. But I may just re-purpose my LOTR cosplay for that. First I'll finish my Halo Armor. Then I'd probably go with the Gre

Halo Armor Day 19

Image
The armor pieces are "done" for now. I still need to do some of the detail work and smooth out a LOT of edges, but man it's so satisfying to have it on. I'm sad I no longer have a full length mirror...or a good place to take photos of it on me. (Somehow I will.) But for now...I have to seriously clean my apartment. It's a bit...chaotic. And my parents come visit me next week sooooo...yeah.

Halo Armor Day 17-18

Image
Ugh, this is definitely my least favorite piece. I really hope I can clean it up better. They fit well but it'll need some fixes to make them look nicer. Last pieces are the boot covers. :D I think I'll have all the basic pieces by the weekend. Just in time for my parents to come visit and stuff.

Halo Armor Day 16

Image
I'm definitely starting to slow down and probably cut some corners with this project. I "finished" the shin guards last night. The forearms will be next. I'll start them tonight. And last are the boot covers. Maybe by the weekend I'll have my basic suit that I can show off before getting into detail work with the 5 mm foam.

Halo Armor Day 15

Image
Bah, I forgot to upload some pictures the other day. Been distracted by video games and weddings. I've made good progress on the shins. I also got the gold mirror visor for my helmet. It looks awesome! Unfortunately, I didn't take a picture yet. ._. Today I can finish up the shins. Soon, only forarms and boot covers. :)

Halo Day 14

Image
The shoulders are done. I got some more 5mm foam for detail work. Everything is coming together! Now I just need to finish the forearms, shins and boots. :) With the pace I'm going that might be withing the next three weeks. :D I will be going back to do detail work on other pieces and of course put visors on things. Then it's time to seal and paint.

Halo Day 13

Image
Finally got the last bits of detail on the helmet. Looks pretty good in these pictures. I definitely see some warping on the actual helmet but I've learned/saw some neat tricks people have done with halo armor and foam so I'm hoping that will help a lot with making it look less like a glue pile. Next up are the shoulders.

Halo Armor Day 12

Image
Now I'm working on arguably the most difficult piece of the costume, the helmet.  Not only does it have to fit, but it has to look proportional. Following the pep file this is what I got. As you can see, it look like a small dinosaur is trying to eat my head. Which means, danger, TOO BIG. :P  Instead of scrapping everything to start over, I decided to see if I could still salvage this build. Making something a little smaller is not that tough. ;)   A few hours later This is my result. I shorted the top brim and the jawline a little bit. The helmet IS meant to be a little roomy so I can pull my head through and put in some cushioning. As you can see, I don't yet have my visor so for now I have to hold off on adjusting this too much.  There are still pieces that need to be added like the mouth piece, the back of the neck and finishing up the jaw line. (It's not suppose to hang off like that really. ;) I'll finish those t

Halo Armor Day 11

Image
I finished the Thigh pieces. :D Mirroring the file confused me at first and I did end up almost making 2 left thighs. :B And here's how I extended the pattern. it'll all be painted so no worries.  I found some real good examples of halo in foam so I have a better idea on how to move forward with many of my pieces. 

Halo Armor Day 10

Image
Last night I put together one of the thigh pieces and ran into my first problem. The thigh piece while the perfect height did NOT fit around my thigh which is in my physique quite supple. ;) Front of Left Thigh Inside of left thigh. For now I've added some extra craft foam "buffer". But I'll have some things to consider before starting on the Right Thigh piece.

Halo Armor Day 8-9

Image
Front Back. So the chest piece is in a finished state. There's still a lot of "clean up" needed but that'll be before I prime for painting. Next I think I'll do the legs.

Gally Progress

Image
So here's some images of the costume. I've decided to redo the arms because these just look grey and dim. Sorry for the bad lighting! Also, this cat suit is NOT easy to move around in. I think I need to make some adjustments so it doesn't choke the ever loving life out of me.

Halo Armor Day 6-7

Image
Progress is good on the armor. Over the weekend I finished the belt (save for adding velcro to keep it closed). I've also made a good deal of progress on the chest piece.  Still learning how to do this. There's more gaps than I'd like in the chest piece

Halo Armor Day 5

Image
I managed to pull myself away from 3D modeling and texturing for awhile to get some work done on the halo armor. I'm currently cutting out the foam patterns and gluing them together. Already, I've burnt myself a couple times. Hot glue is really hot...who knew? Anyboo...I managed to get the hand plates and most of the belt glued together. I'm learning as I go unfortunately so the seams aren't pretty and neither are the edges. :/ Luckily I found my sharp scissors this morning so maybe going forward the edges will be slightly cleaner. :3 Butt piece, codpiece, side bits and those tiny things are for my hands. So the foam is thicker than I thought so luckily a lot of the teeny-tiny pieces of the pattern won't fit so I don't have to hurt myself doing that. I think I'm going to be lining my armor pieces with a thinner foam for better fit and filling in gaps as they come...because heck, I'm REALLY not good at cutting clean edges with the tools I have

Costume progress and DISTRACTIONS!!!

Gally Costume The boots came in the other day and they fit! BUT, they don't quite come up to my knee like I'd hope they would. However, they're awesome boots that double as high calf boots and ankle boots. Convertible boots man!  I plan on putting on the whole costume this weekend and hopefully getting a few pictures.  Halo Armor I think my cutting hand has recovered. Now for...you guessed it, MORE CUTTING. This time into the foam we go.  I think I'm going to start with a small piece, the hand plates before trying something larger. I need to figure out angled cuts and so on.  Note to self: Download Pepakura VIEWER onto the laptop and transfer the scaled versions for reference.  (Currently I only have the program on my desktop.)  Distraction! So I got a little sidetracked while resting my hand to play with the Dragon Age Toolset. It started a love-hate relationship all over again. I spent the past 2 days trying to reskin models, edit models and then

Halo Armor Day 2- 4

Day 2: Scaled the armor and printed everything out. ...I have a lot of work ahead of me! However, I now have ALL the supplies including the EVA foam. Day 3: The cutting of the patterns begins! Day 4: It's taken 2 days to cut the paper patterns out. I'll have to take a break before cutting foam, so as not to hurt my hand badly. I think I'll start with the belt.

Gally Day 1 and 2

Image
Day 1:  Gally Costume Knee Pads. I cut out the shape of the knee pads and glued velcro straps. Day 2: Painting Today I went outside to paint the pads silver. Using Fabric markers, I added the details to the knee pads AND the turtleneck. I found some gloves at the Party Supply store that look like robot hands (Transformers!) So that worked out pretty good. Some lessons learned: Fabric markers aren't really all that great and they love to LEAK and linger..

Halo Armor Day 1

Image
So I started in on testing out Pepakura files and I learned some things. 1) Some of the pieces when scaled down are so tiny! I think I need to either simplify the pattern  so there are less polys because this is re-darn-diculous. 2) My modge podge is dried solid. :( 3) It takes a long time to make a part. It turned out okay. It fits which is what I was testing  I figure now that if I only print out certain parts I can hold them up to my body to check if the scale is right or at least close.  I still need to buy the EVA foam so, the project takes a break.  For Gally, I found robot gloves and got some craft foam to make the knee pads. It shouldn't take long. I might do it this weekend. :)