Zelda Costume Process
Most of my time has been spent making the costume in time for Halloween, which was successful! However, I haven't done the day to day journaling like past costumes. It's going to be one big info dump, so hold on your butts. It's go time!


Underdress
The underdress was cut from Simplicity Pattern 8113. I cut it out of white jersey knit and following the marks exactly. I sewed the pieces together, but I did not follow the instructions for this part. I did not install a zipper or lining. After sewing the pieces together, I fitted it on my dress form and made some cuts to the neckline and back neckline. Then I hemmed the edges of the sleeves and collar. I did not hem the skirt although after Halloween I intend to serge the skirt edge. For clean edges. (Man maybe I should have done that for the collar too. Ah wells.)
I left out the embroidery of the harp and banner and the gold trim. I didn't expect to have that part of the costume in the camera shots. So that's where I cut corners.
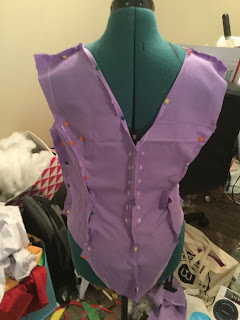
Surcoat
Similar to the underdress, I cut the pattern out as it was printed. It was cut out of a purple cotton.
I ironed all the pieces and pinned them to my dress form to do some tailoring. I marked with chalk where to take things in, where to shorten and how to create the appropriate neckline and backline.
I made the cuts on the dress form, then sewed the pieces together. Again I didn't follow instructions, I did not cut and sew a lining into it. I hemmed all the edges instead. I ironed in some interfacing along the back and in the front.


For the belt, I sewed two button holes in the side. The last thing I did was install the eyelets. Two in front and about 16 in the back. I laced things with white leather lacing.
I did not have time although I had the materials to paint the runes that line the edges of the surcoat.
Armor, Crown and Jewelry
Nearly all the accessories were 3D printed out of Antique Gold PLA and Transparent Blue PLA. The Crown was downloaded from Thingiverse and the rest of the armor from Etsy.
The pauldrons were printed along with the necklace piece. Used a combination of metal jewelry rings and craft foam to connect them. The blue dangling gems were hot glued to the rings. The back of the pauldrons also had metal rings and a piece of cord to secure the back and hold things in place.
The red gem on the necklace was printed with clear PLA and dyed red.


The belt pieces were printed and combined with jewelry wire, brass jewelry chain, and white craft foam backing. I used a necklace hook at the end of one chain and hooked into the wire wrap of one of the belt dangles.
The chain weaves into the button hole of the surcoat and comes out the other side.
The crown was simply printed and assembled with hot glue.

I'm glossing over a few things like trying to apply a finishing and sanding the 3d prints, but I did a little of that.
Other Little Things
I detailed how I made the aprons in another post so no need to repeat that here.
The gloves I purchased on Etsy and Amazon. I got some gold and silver fabric markers to draw on the patterns.

The ears were the Wild ears from Aradani Studios. I got them pre-painted. I got some solid black ear cuffs.
The wig I got from Arda Wigs.
I used craft foam to style the ornament in her braid. Painted with flex paint. 3D printed the little "acorns" for the tips of her side strands and the tip of the braid. I wrapped the hair in medical tape and super glued the tips on.

That's how I did things.


Comments
Post a Comment